
 |
| 24mm | 1/250s | f/5.6 | ISO100 | 3-image HDR |
High Dynamic Range (HDR) photography has become very popular over the past few years. I am fortunate to have started learning about it from near the beginning, and have become proficient in shooting and processing HDR images. I am very overdue for writing this tutorial. This first part will focus on shooting the bracketed images. The next post will focus on post-processing.
Why HDR?
The range of light in a scene from the darkest black to the brightest white is the dynamic range. The dynamic range seen by our eyes is much greater than what can be captured by today's digital cameras. High dynamic range photography is a way of capturing this range of light normally unable to be photographed. This post gives a good explanation of dynamic range and camera bit-depth.
The graphic below is one of the most simple and effective explanations I've seen for HDR photography. It was taken from The Art of HDR Photography post on dpreview by Uwe Steinmueller, which I highly recommend reading.
What I like about this graphic is that it depicts how I view HDR photography. The dynamic range in a scene is huge, but the camera can only capture a small subset of that range. Bracketing allows the entire dynamic range to be captured in a series of images. An HDR image is made by combining all the bracketed images into one "super image". This image cannot be viewed on any computer monitor because the monitors (just like your camera sensor) can only display a small subset of the dynamic range. Tone mapping compresses this image to something we can view and get printed.
Scenes for HDR
Not every scene will work as an HDR. Trust me, I've tried almost all of them. Night scenes are difficult (but not impossible) to use for HDR. Action is nearly impossible to bracket. Portraits look horrible in HDR. The scenes to look for when applying HDR are the following:
HDR Shooting Steps
The range of light in a scene from the darkest black to the brightest white is the dynamic range. The dynamic range seen by our eyes is much greater than what can be captured by today's digital cameras. High dynamic range photography is a way of capturing this range of light normally unable to be photographed. This post gives a good explanation of dynamic range and camera bit-depth.
The graphic below is one of the most simple and effective explanations I've seen for HDR photography. It was taken from The Art of HDR Photography post on dpreview by Uwe Steinmueller, which I highly recommend reading.
 |
| © 2010, www.dpreview.com & Uwe Steinmueller. |
What I like about this graphic is that it depicts how I view HDR photography. The dynamic range in a scene is huge, but the camera can only capture a small subset of that range. Bracketing allows the entire dynamic range to be captured in a series of images. An HDR image is made by combining all the bracketed images into one "super image". This image cannot be viewed on any computer monitor because the monitors (just like your camera sensor) can only display a small subset of the dynamic range. Tone mapping compresses this image to something we can view and get printed.
 |
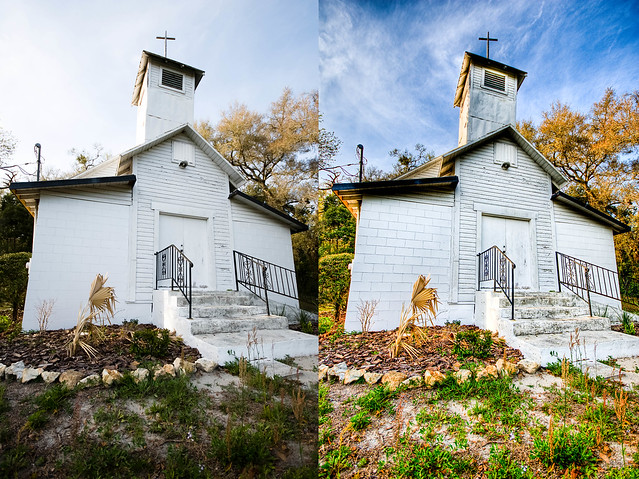
| 10mm | 1/40s | f/4 | ISO100 | 3-image HDR Before & After |
Scenes for HDR
Not every scene will work as an HDR. Trust me, I've tried almost all of them. Night scenes are difficult (but not impossible) to use for HDR. Action is nearly impossible to bracket. Portraits look horrible in HDR. The scenes to look for when applying HDR are the following:
- Multiple light sources
- Lots of highlights and shadows
- Bright / dramatic skies with a dark foreground (such as sunrise/sunset)
- Lots of detail and texture
 |
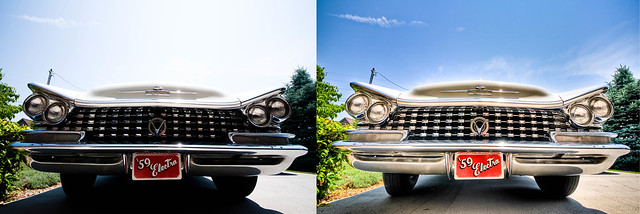
| 15mm | 1/10s | f/29 | ISO100 | 3-image HDR Before & After |
Camera and Lens
HDR is not camera or lens specific, use what you have. Some cameras have auto-bracketing modes where the camera will automatically take the bracketed images in succession (see the list here). While this is an awesome feature to have, you can still take HDR with any camera. I've even shot an HDR with my point-and-shoot!
 |
| Canon PowerShot SD880 IS | 3-image HDR |
HDR Shooting Steps
This list of tips came from Scott Kelby, and they are pretty accurate for what I do while shooting HDR. Most of them are not firm rules, more like guidelines. But this is a great place to start.
1. Use a Tripod
The goal of HDR is to create multiple (lets say 3) bracketed images of the same scene. And by the same scene I mean the exact same scene. Although you can shoot HDR handheld with practice (see later in this post) lets stick with a tripod right now.
2. Shoot in RAW
HDR increases the bit-depth of the image. A jpeg image from your camera is already compressed to 8-bit. A RAW image will contain between 12 and 16-bits of data, depending on your camera model. It is best to shoot in RAW to ensure you have the maximum amount of data for the HDR.
3. Use Aperture Priority
The process of bracketing the images will change the exposure. Exposure is controlled by aperture and shutter speed (and ISO and flash and ..., but that's not important right now). Setting the aperture as a constant and bracketing with the shutter speed will ensure that each image in the set has the same depth of field. This can cause challenges when doing handheld HDR, which will be discussed later.
4. Lowest ISO
HDR processing can introduce noise into an image. Shooting at a high ISO will only exacerbate this issue. Set to shoot at the lowest ISO your camera will let you. It shouldn't matter since you're using a tripod anyway, right ;).
5. Set Continuous Shooting Mode
To ensure the minimal amount of movement between frames (think trees, clouds, people, etc.) set the camera to take the bracketed images in quick succession. This requires only one press-and-hold of the shutter to get all of the bracketed images. Note, this will only work if your camera has auto-bracketing.
6. Expose the Scene
Set the exposure for the scene just like you normally would.
7. Set Exposure Bracketing (-2, 0, +2)
With the exposure set, bracket the images around this base exposure (0). The standard bracketing is 2-stops under (-2) and 2-stops over (+2). With some cameras this just requires flipping a switch, but with others this will require manually changing the exposure (I recommend using exposure compensation).
8. Check the Results
This step is one that I'm prone to skipping, and it can be the most important out of all of them. When you finish taking the bracketed images, look through them on your camera. Ensure that the darkest image has captured all the detail in the highlights and that the brightest image has captured all the detail in the shadows. You can do this by observation or by inspection of the histogram. The brightest image should have none of the shadows clipped (no pixels on the left side of the histogram) and the darkest image has none of the highlights clipped (no pixels on the right side of the histogram). This ensures that you have captured the entire dynamic range of the scene.
If you find that you haven't captured enough dynamic range in your three images, there are a few options to fix this. First, you can change the exposure setting of the middle frame (0) and shoot the bracketed set again. If that doesn't work (and it likely won't for sunrise/sunset) then you may need to take more than three images.
Some cameras can do this for you automatically, while others limit the bracketed frames to 3. My D7000 (and previous D80) were limited to 3 bracketed frames, and I came up with a way to get around this:
1. Set the exposure for the scene (using all the steps above)
2. Underexpose by 2-stops (-2 EV)
3. Take the 3 bracketed frames.
4. Overexpose by 2-stops (+2 EV)
5. Take the 3 bracketed frames.
6. Delete the duplicate frame at 0.
 |
| 10mm | 1/60s | f/4.5 | ISO100 | 3-image HDR Before & After |
Handheld HDR
Now that I've explained the rules for HDR, I'm going to tell you how to ignore the first one. There may be times when you want to shoot HDR and you don't have a tripod. This only works well with cameras with auto-bracketing, although I have done it with cameras that don't (you have to be very careful).
With the auto-bracketing and continuous shooting mode set, the camera will do all the work with a single click of the button. Try to hold the camera as steady as possible between the frames. Consider crouching or leaning on something for stability. HDR processing software can account for some shift between the bracketed images, so they don't have to line up perfectly.
One of the biggest things to check during handheld HDRs is the shutter speed. With aperture priority set, the camera will be changing the shutter speed between the images. The overexposed image (+2) will have the longest shutter speed, and is the frame to watch for camera shake. My rule of thumb is to set the middle exposure on 1/200s. This will make the +2 frame at 1/50s, which is just at the limit of my ability to hold the camera steady. You can try to go lower, but it depends on how stable your setup is.
No comments:
Post a Comment